Hello Code Breakers,
Here i am with another Basic Tutorial for MATLAB GUI Programming. Today i am going to show you how to make simple image viewer using MATLAB. It will be quite fun. so Lets Break It.
First of all if you have not check my first Tutorial and you are not aware of MATLAB GUIDE than first check that. MATLAB GUI Basic Programming Tutorial1
Now here I will asume that you know how to open GUIDE and save you project. So first open GUIDE and Select Blank GUI(Default) and save it as Tutorial2. This will generate 2 files "Tutorial2.fig" and "Tutorial2.m". You can save this with whatever name you want to use.
So now if you have checked my MATLAB GUI Basic Programming Tutorial1 you have idea about how to use Push Button and Edit Text components. It this we are going to use one new component called "Axes" a shown in above figure.
So lets Drag and Drop all the components in drawing area and adjust them as showed in below figure.
So it should be Look like this. Now let me explain the use of all three components in this tutorial.
Push Button: we ware going to use Push Button as to open file browser for selecting image file.
Edit Text: we will display the path of the selected image file in Edit Text.
Axes: we are going to use axes as image viewer which ever image we will select it will be displayed in axes.
Now lets change the Properties of Components according to our convenience.
For axes
change its "Tag" properties from "axes1" to "img_display"
For Push Button
String: Load Image
Tag: pb_load
For Edit Text
Now as we have set all the properties save the file and switch to Tutorial2.m file.
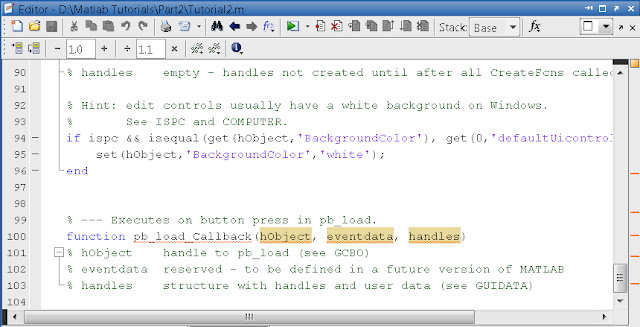
Now find the Callback function for "pb_load" push button.
% --- Executes on button press in pb_load.
function pb_load_Callback(hObject, eventdata, handles)
% hObject handle to pb_load (see GCBO)
% eventdata reserved - to be defined in a future version of MATLAB
% handles structure with handles and user data (see GUIDATA)
Now On button Click Following events occurs...
To display Image on Axes.
axes(handles.img_display);
imagesc(img);
set(handles.img_display,'Visible','off');
Here imagesc() is matlab inbuilt function for detail you can use MATLAB help which will give you best example of this function.
So that's it our final code will be look like this
% --- Executes on button press in pb_load.
function pb_load_Callback(hObject, eventdata, handles)
% hObject handle to pb_load (see GCBO)
% eventdata reserved - to be defined in a future version of MATLAB
% handles structure with handles and user data (see GUIDATA)
[filename, pathname] = uigetfile({'*.bmp';'*.jpg';'*.gif';'*.*'}, 'Pick an Image File');
img=imread([pathname,filename]);
set(handles.edit1,'String',[pathname,filename]);
axes(handles.img_display);
imagesc(img);
set(handles.img_display,'Visible','off');
guidata(hObject, handles);
That's it. More is coming till then..
Break It, Feel It and Learn It
Here i am with another Basic Tutorial for MATLAB GUI Programming. Today i am going to show you how to make simple image viewer using MATLAB. It will be quite fun. so Lets Break It.
First of all if you have not check my first Tutorial and you are not aware of MATLAB GUIDE than first check that. MATLAB GUI Basic Programming Tutorial1
Now here I will asume that you know how to open GUIDE and save you project. So first open GUIDE and Select Blank GUI(Default) and save it as Tutorial2. This will generate 2 files "Tutorial2.fig" and "Tutorial2.m". You can save this with whatever name you want to use.
So now if you have checked my MATLAB GUI Basic Programming Tutorial1 you have idea about how to use Push Button and Edit Text components. It this we are going to use one new component called "Axes" a shown in above figure.
So lets Drag and Drop all the components in drawing area and adjust them as showed in below figure.
So it should be Look like this. Now let me explain the use of all three components in this tutorial.
Push Button: we ware going to use Push Button as to open file browser for selecting image file.
Edit Text: we will display the path of the selected image file in Edit Text.
Axes: we are going to use axes as image viewer which ever image we will select it will be displayed in axes.
Now lets change the Properties of Components according to our convenience.
For axes
change its "Tag" properties from "axes1" to "img_display"
For Push Button
String: Load Image
Tag: pb_load
For Edit Text
Now as we have set all the properties save the file and switch to Tutorial2.m file.
Now find the Callback function for "pb_load" push button.
% --- Executes on button press in pb_load.
function pb_load_Callback(hObject, eventdata, handles)
% hObject handle to pb_load (see GCBO)
% eventdata reserved - to be defined in a future version of MATLAB
% handles structure with handles and user data (see GUIDATA)
Now On button Click Following events occurs...
- Open file Browser.
- Select image File.
- Display image on axes
- Diplay file path in Edit Text Box.
So first for Open File browser
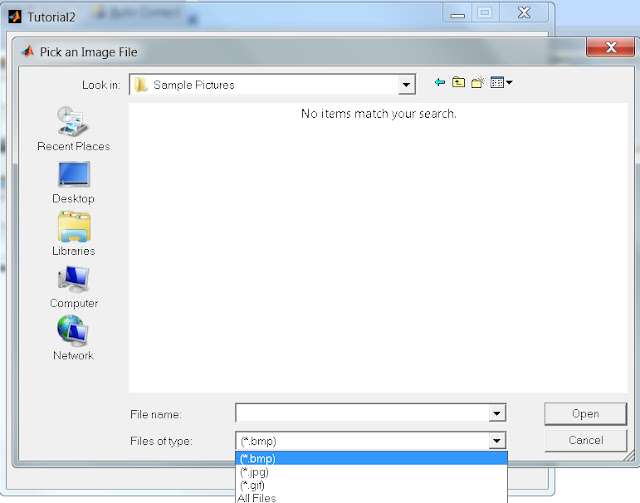
[filename, pathname] = uigetfile({'*.bmp';'*.jpg';'*.gif';'*.*'}, 'Pick an Image File');
here filename is variable which stores the name of file which we will select. and pathname is variable which stores the file path.
uigetfile() is matlab inbuilt function which will open the file browser. Now if you want add file type in file selection you can do like this.
uigetfile({'file type1','file type2','*.*'},'File browser name');
Here '*.*' is used to show "All files" in file browser.
Now after that we want to read image file so that we can display it in matlab axis component.
img=imread([pathname,filename]);
Here imread() is matlab inbuilt function which will read image file and will store in matlab variable.
Here img matlab variable.
To set the file path in Edit Box
set(handles.edit1,'String',[pathname,filename]);
To display Image on Axes.
axes(handles.img_display);
imagesc(img);
set(handles.img_display,'Visible','off');
Here imagesc() is matlab inbuilt function for detail you can use MATLAB help which will give you best example of this function.
So that's it our final code will be look like this
% --- Executes on button press in pb_load.
function pb_load_Callback(hObject, eventdata, handles)
% hObject handle to pb_load (see GCBO)
% eventdata reserved - to be defined in a future version of MATLAB
% handles structure with handles and user data (see GUIDATA)
[filename, pathname] = uigetfile({'*.bmp';'*.jpg';'*.gif';'*.*'}, 'Pick an Image File');
img=imread([pathname,filename]);
set(handles.edit1,'String',[pathname,filename]);
axes(handles.img_display);
imagesc(img);
set(handles.img_display,'Visible','off');
guidata(hObject, handles);
Now save and Run file.
That's it. More is coming till then..
Break It, Feel It and Learn It


